Showing posts with label DIY. Show all posts

Monday, April 1, 2013

Posted by steph fung | File under : , , ,
This DIY is for the Settlers of Catan fans! It's pretty much an organizer/holder for the number pieces. I have the expansion as well so it fits both sets. It also makes set-up a lot easier, just put the pieces in order from A-Z inside the tube and when you take them out, you don't have to look through them!
So this is pretty much it, very easy, you don't even have to make a sleeve for it.
I did forget to take process shots...but all you need is a Redoxon tube, you can get this anywhere for around $3 and you'll get your Vitamin C! (btw best vitamin C tablets I've ever had)
 I just sewed a linen sleeve on top and stamped on some lettering! Enjoy!

Saturday, March 16, 2013

Posted by steph fung | File under : , , ,
I wanted to get a leather dog collar for Nunu, but couldn't find one I liked. I had some vinyl at home so I decided to make one! Here's how it ended up looking:
If you want to make a cute collar for your dog, here's how I did it!
What I used:
-I had an old dog collar I think is from the dollar store, I just took it apart to use the buckle and the 'D' ring.

-Some vinyl!
-Rivet
-Hammer
-Sewing machine or needle and thread!

Here's kind of a tutorial, I did my best in remembering to take pics along the way:
Measured the width of the collar.
 Made a template out of paper first, I just used the same length since it fit Nunu.
Measure out double the width of the original template. Then cut the vinyl with a rotary cutter.
Checked it on Nunu haha he didn't want to put his head up :(
Sewing time! I just folded two sides toward the middle line and clipped them together since pins would leave holes in the vinyl. I'm pretty broke so I made a ghetto hemming guide with cardboard taped to my sewing machine!
Then attaching the buckle! I just followed the hole on the original collar and sewed the 'D' ring on one side.
Between the buckle and the ring, I attached a rivet. It usually has instructions on the package on how to attach it. I just used a hammer to attach it.
I have a leather hole puncher for rivets, so I just used that to punch holes for the adjustable part on the other end of the collar! I didn't take pictures but this is when I also sewed the end closed.
Here it is on Nunu! Hmm...I realized after it gets kind of hidden by all his hair :( oh well, it was a fun project! Enjoy!
"See it better now? o.o" hehe

Monday, February 11, 2013

Posted by steph fung | File under : , , ,
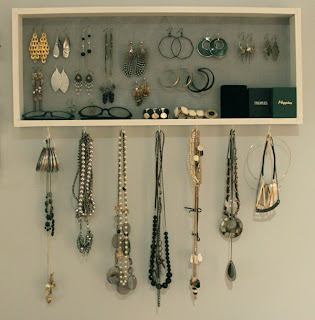
Here's a DIY jewelry maker! I made this from random things I found at home, you can go to the store to buy the items to make this and it should cost less than $20.
List of things I used to make it:
   -Wooden frame (mine was a bottom of a shelf)
   -White spray paint and a clear spray coat
   -Cardboard (backing)
   -Aluminum foil duct tape (really sticky tape!)
   -Mesh, wire or fabric with larger holes
   -White piece of fabric
   -Nails and screws
   -Frame hooks
   -Cup hooks (hooks with rubber over it)

So this is how the frame started out looking, it use to be a bottom piece of a shelf so the top and bottom just look like unfinished wood because you wouldn't be able to see it on the shelf. I covered it with two coats of spray paint and one coat of gloss clear spray.
Then I traced the frame onto a piece of cardboard and cut out the backing with a utility knife, or scissors...I don't remember.
 Found this screen mesh lying around so I used it on the backing to hold earrings.
Taped a white piece of background fabric to the cardboard with the foil tape!
TADA! Did the same with the screen mesh.
Took the screws and screwed on those frame hooks! One on each side. Then hammered the cardboard backing into the wooden frame.
I bought seven cup hooks, two were larger to fit chunkier necklaces which I put on the outer sides. Then I measured out the seven hooks and drilled holes into the frame.
It's DONE! Now I piled all my stuff onto it!! Good times. Enjoy!